Signature · 2 days, with 24 hours ahead for the ice cream and 3–4 hours on the day of serving · Serves 4
Nutella-filled doughnuts with coffee sugar and toasted milk ice cream
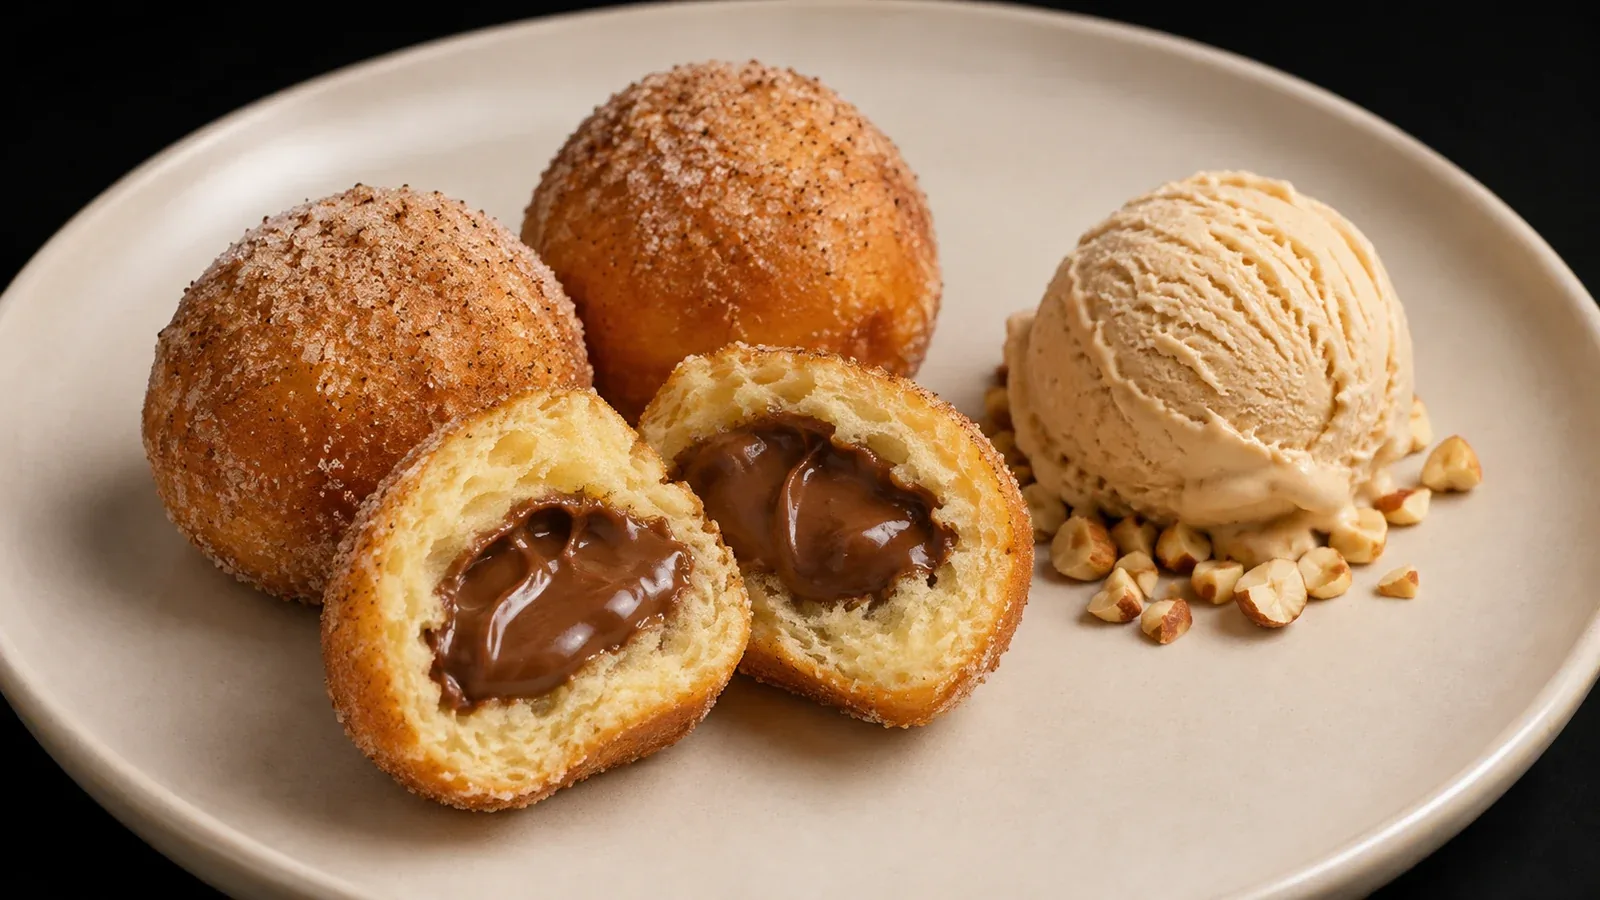
Concept: coffee, milk and a sweet pastry become a plated dessert. Three small doughnuts per person retain the tender yeast dough, lightly sugared surface and generous Nutella center, accompanied by toasted milk ice cream and hazelnuts with a touch of salt.
Twist: coffee moves into the coating sugar so its aroma comes first and balances the filling. Toasted milk powder gives the ice cream biscuit and caramel notes without another sweet sauce; cold ice cream contrasts with warm dough, and toasted hazelnuts extend the flavor of the filling with a crunchy texture.
Special equipment: ice cream machine suitable for a 500 g batch; frying thermometer and probe; piping bag with a filling nozzle
Ingredients
Toasted milk ice cream
- 25 g skim milk powder.
- 240 g pasteurized whole milk.
- 150 g pasteurized heavy cream, approximately 35 % fat.
- 60 g sugar.
- 25 g confectioners' glucose syrup, approximately 80 % solids; not powdered glucose.
- 1 small pinch fine salt.
Dough and frying
- 200 g medium-strength all-purpose flour, plus up to 10 g for the work surface.
- 25 g sugar.
- 3 g instant dry yeast.
- 3 g fine salt.
- 75 g pasteurized whole milk, at room temperature.
- 50 g beaten egg without the shell, approximately 1 medium egg.
- 2 g vanilla extract.
- 25 g unsalted butter, softened but not melted.
- 1.5 l sunflower oil for frying; adjust to the pan to obtain a depth of 4–5 cm without exceeding half its height.
Coffee sugar
- 40 g fine granulated sugar, not confectioners' sugar.
- 2 g pure instant coffee, crushed to a fine powder; not ground coffee or a sweetened mix.
Nutella filling
- 160 g Nutella, at room temperature: 144 g for filling and approximately 16 g allowance for the piping bag.
Salted hazelnuts
- 24 g peeled hazelnuts.
- 1 small pinch fine salt.
Method
Toasted milk ice cream
- Toast the milk powder. Spread the 25 g in a thin layer in a small baking dish. Place in a preheated 140 °C (284 °F) conventional oven for approximately 12–20 minutes, stirring every 3–4 minutes and breaking up lumps. Remove when golden beige and biscuit-scented; the endpoint matters more than the time. Immediately transfer to a cool container. If dark brown areas or a burnt smell develop, remake this component: the bitterness will remain in the ice cream.
- Disperse and heat. Mix the toasted milk powder with the sugar. Gradually whisk in the liquid milk, first forming a smooth paste and then a fluid mixture. Add the cream, glucose and salt. Heat gently, stirring along the bottom, to 82–85 °C (180–185 °F) without a vigorous boil; remove from the heat. Briefly blend with an immersion blender, keeping its head submerged to avoid introducing foam. Pass through a fine sieve if lumps remain: no gritty particles should be noticeable.
- Chill and age. Transfer the base to a shallow metal container, set it in a generous ice-water bath and stir with a clean utensil. Aim to reach 5 °C or below in approximately 1 hour, replenishing the ice; check with a probe. The cooling limits are 60 to 21 °C within no more than 2 hours, then 21 to 5 °C within the following 2 hours. Cover once chilled and age for 4–12 hours at 5 °C or below. If these controls were not met, do not store the base for another day.
- Churn and firm up. Process the cold base in the machine according to its manual, typically 20–35 minutes, until it has a soft ice cream consistency and holds the groove left by a spatula. Transfer to a shallow lidded container and freeze at −18 °C for 4–6 hours, until it holds a stable serving shape. It yields approximately 500 g, before losses on utensils: use 75 g per person, 300 g total; the surplus provides a practical domestic batch size and is reserved separately.
- Prepare for serving. Before frying, check firmness. If very hard, transfer the closed container to the refrigerator for 10–20 minutes, checking that it softens only enough to serve. Keep cold until plating; do not let it thaw or refreeze melted ice cream.
Dough and frying
- Mix. Combine the flour, sugar, yeast and salt. Add the milk, egg and vanilla; work for 4–5 minutes until no dry areas remain. Cover and rest for 10 minutes to hydrate the flour. The dough should be soft and slightly tacky, without resembling a liquid batter.
- Develop the dough. Knead for 5–7 minutes by hand or on a stand mixer's low speed. Incorporate the butter in 3 additions and continue for 5–8 minutes, until the dough is smooth and elastic and can stretch into a thin membrane without immediately tearing. If sticky, use a scraper and brief rests; avoid correcting it with handfuls of flour. Aim for a dough temperature of 24–26 °C; if it heats up and becomes greasy, refrigerate for 10 minutes before continuing.
- First rise. Leave in a covered bowl at 24–26 °C for approximately 60–90 minutes, until nearly doubled and visibly aerated. A colder kitchen will require longer. Do not accelerate it in a hot oven: the butter must remain incorporated and the dough should not develop a sour smell or a dried surface.
- Divide and shape. Gently deflate. Weigh the dough and divide it into 12 equal pieces, approximately 32 g each. Round with moderate surface tension, close the seam underneath and flatten slightly to about 4.5 cm across and 2 cm thick, without expelling all the air. Place on individual squares of baking parchment, with a little of the reserved flour if needed. Cover without letting the covering touch the pieces.
- Second rise. Leave for 40–60 minutes at 24–26 °C, until visibly puffy and a very gentle press on the side slowly springs back, leaving a small mark. If it springs back immediately, it needs longer; if it collapses without recovering, it is overproofed. Do not pull on the dough when handling: transfer each piece using its paper.
- Fry with control. Heat the oil in a deep saucepan approximately 20 cm in diameter to 170–175 °C (338–347 °F), measuring without touching the bottom. Slide in 3 pieces per batch, seam-side down; immediately remove each paper with tongs. Maintain that range and cook for approximately 1.5–2 minutes per side, 3–4 minutes total, until evenly golden. Let the oil return to temperature between batches and adjust according to doneness rather than the clock. The oil must never smoke.
- Check and drain. In the first batch, check one piece with a thin probe inserted from the side: the center should reach approximately 90–93 °C (194–199 °F) as a crumb doneness reference, and cutting it open should reveal no wet or pasty band. This is a bread-quality reference, not a universal food safety table. If the outside browns before the center cooks, work near 170 °C (338 °F) and extend cooking. Drain all pieces on a rack over a tray without stacking. The piece opened for checking is served as one of the split doughnuts specified in the plating.
Coffee sugar
- Mix. Crush the instant coffee until no coarse granules remain and mix thoroughly with the sugar. Prepare during the first rise and keep dry and covered.
- Coat by batch. After draining each batch for 1–2 minutes, roll the still-hot doughnuts in the mixture and shake off the excess. Aim for a thin, even film; some sugar will remain. Do not wet them or add brewed coffee, which would soften the surface.
Nutella filling
- Prepare the piping bag. Work the Nutella with a spatula until pliable and load a piping bag fitted with a long filling nozzle. If too firm because of a cold room, warm the amount needed in a closed container set in 30–35 °C (86–95 °F) water for 5–10 minutes; keep water out of the filling. Do not add milk, cream or oil.
- Fill. Let the doughnuts lose their intense heat, approximately 5–8 minutes after leaving the oil: they should remain warm and be comfortable to hold. Make a channel from the side with a clean skewer, gently move it inside without piercing the opposite wall and fill with 12 g per piece, weighing the gain on the first few to calibrate pressure. Do not force them until they burst. The two halves of the test piece each receive 6 g through their inner face. Distribute the 144 g among the 12 pieces; the piping allowance is not served separately.
Salted hazelnuts
- Toast and finish. During the first rise, bake the hazelnuts at 160 °C (320 °F) for 8–12 minutes, until fragrant and golden in the center. Cool completely, coarsely chop and mix with the pinch of salt. Keep dry; distribute 6 g per plate at serving time.
The dish
Use four broad, flat, light-colored ceramic plates, dry and at room temperature so they do not accelerate ice cream melting. Group three doughnuts on each plate slightly off-center, leaving their sugared surfaces visible. Split one of the three into two halves and set both cut-side up to show the airy crumb and Nutella center; use the piece already opened to check doneness here. Arrange the salted hazelnuts in a small bed beside the doughnuts. Shape a 75 g serving of ice cream and place it partially on those hazelnuts, leaving a small space from the warm dough. Distribute the remaining hazelnuts for each portion around that same area so they can be eaten with the ice cream. Remove stray grains from the rim and serve immediately, showing golden dough, a glossy dark center and pale beige ice cream; the filling stays inside and no sauce is added over the surface.
Key points
- Coffee must be instant and finely powdered: ground coffee leaves hard particles and uneven bitterness.
- Lightly golden milk powder adds flavor; burning it makes all the ice cream bitter.
- The second rise determines lightness: fry when the indentation returns slowly.
- Maintain the oil at 170–175 °C (338–347 °F) and check the first batch's crumb before repeating its timing.
- Fill while warm and add the ice cream last; an excessively hot doughnut makes the filling runny and quickly melts its accompaniment.
Pairing
A short unsweetened espresso, served separately, extends the toasted notes without increasing sweetness. To avoid more caffeine, a decaffeinated coffee with the same profile serves that purpose.
Notes
- Storage and quality: these doughnuts are designed to be fried, filled and eaten in the same service, ideally within 15–20 minutes of frying; reheating filled pieces is not proposed. Process the correctly chilled ice cream base within 24 hours, holding at 5 °C or below. Store the finished ice cream covered at −18 °C, with a proposed quality window of 2 weeks; this is not a validated shelf life. Put away the surplus before service without mixing it with ice cream softened on plates.
- Equipment and scaling: a machine that works with about 500 g of base is required. Do not divide that batch below the machine's minimum load. For more guests, scale dough and filling by weight, retain 32 g pieces and recalculate batches, oil quantity and freezer capacity; fermentation and frying times are not multiplied by the number of servings.
- Yeast substitution: the 3 g instant dry yeast can be replaced with 9 g fresh yeast, crumbled into the recipe's milk; judge both rises by volume and indentation, not an automatic conversion of times.
- Status: an original development with documentary QA, awaiting a cooking trial. Record actual frying time, crumb lightness, coffee intensity and ice cream texture in particular.